Hello all! Welcome to my blog! This blog would feature all the cool things I would think to share with the world, so you can say its a Miscellaneous Blog! haha! I hope you all enjoy reading my blog, have fun and a great day!
Do check out my first post -
http://toxifier.blogspot.com/2011/07/hello-world.html
Hey all my dear readers! :D I hope you all are doing great! ^_^
Continuing the Computer Maintenance series I started sometime back, today I wish to discuss with you all the topics listed after the following links. Just in case you want to access the last posts in this series, here are the links:
Part 2: Data Backup & Disaster Recovery - Click Here
Let's first consider in brief the structure of this post.
Introduction
Windows Backup Tool: Acronis True Image Home
Windows Backup Tool: NovaBACKUP Home Protection
More Windows Data Backup Tools
MAC OSX Data Backup Tool: Data Backup
MAC OSX Data Backup Tool: Smart Backup
More MAC OSX Data Backup Tools
Windows Data Recovery Tool: Recover My Files
Windows Data Recovery Tool: EASEUS Data Recovery Wizard
More Windows Data Recovery Tools
MAC OSX Data Recovery Tool: Boomerang Data Recovery Software
MAC OSX Data Recovery Tool: VirtualLab
More MAC OSX Data Recovery Tools
Conclusion/Comments
Introduction
Last time I discussed with you all the importance of Data Backup and how is it useful in case of disasters by helping you recover your lost data. Today, I am going to discuss with you all the tools required for the same. I am discussing a few tools each for Data Recovery and Data Backup for Windows and Mac OSX each in brief.
Windows Backup Tool: Acronis True Image Home
Acronis True Image Home provides users with reliable and timeless backup and recovery of their home PC's operating system, applications, settings, and personal files. It automatically creates incremental backups once every five minutes allowing user to roll back their system, files, and folders to any point in time. It has online storage services to automatically back up valuable data or files over the Internet to a secure location.
Acronis True Image (or simply True Image) is a brand name for a line of backup and disk imaging software for Microsoft operating systems, produced by Acronis. As disk imaging software, True Image can restore the previously captured image to another disk, replicating the structure and contents to the new disk, also allowing disk cloning and partition resizing, even if the new disk is of different capacity. The backups are in a proprietary and undocumented file format which uses a .tib filename extension.
NovaBACKUP Home Protection automatically backs up and protects important files on all of your computers from one easy to use control panel. Some of its key features:
Automatic processes continually update your protection - no need to remember to run backups.
Central management makes it easy to stay on top of all the data in your house.
Disaster recovery and full disk imaging options allow you to restore your entire system.
Fast bit technology updates your backups with bit-level incremental changes.
Genie Backup Manager Home: Genie Backup Manager Home backs up your photos, media, email, and personal files and folders in a secure location and recovers your data in an instant. It performs a complete backup of your system (disaster recovery) or simply backs up only your personal data.
Norton Ghost: Norton Ghost safeguards your system, settings, applications, and files with flexible, comprehensive backup protection and recovers your system and data when there are system failures. It saves he backups to an FTP site for easier off-site management and even backs up your data to network-attached storage devices.
R-Drive Image: R-Drive Image is a utility providing disk image files creation for backup or duplication purposes. A disk image file contains the exact, byte-by-byte copy of a hard drive, partition or logical disk and can be created with various compression levels on the fly without stopping the Windows OS and therefore without interrupting your business. These drive image files can then be stored in a variety of places, including various removable media such as CD-R (W)/DVD, Iomega Zip or Jazz Disks, etc. By the way, what am I saying? Jazz Disks? I accidentally mentioned a little too many names of external media I guess! :D
TurboBackup: TurboBackup is used to back up work, synchronising between laptop, netbook, or desktop PCs; scheduling unattended after-hours backup; exporting data to off-site locations to prepare for disaster recovery; archiving personal data to a CD/DVD or memory disk for sharing or storage.
NTI Backup Now: NTI backup Now is a backup and restoring solutions for SMB MIS, LAN, SOHO, personal desktops, notebooks, and netbooks. It allows you to backup your complete PC system or specific files and folders that includes your data, applications, photos, videos, music, financial documents, and settings.
PowerBackup: It offers three backup methods, full, differential, and incremental to perfectly suit user needs. Full is a complete backup of all files. Differential mode archives changed or new files. Incremental mode archives new files created since last backup.
Backup4all: Backup4all is a backup program for Windows that protects your data from partial or total loss. It automates the backup process saving you time, compresses the data to save storage space (using standard zip format) and encrypts your backup to protect from unauthorized usage. Using Backup4all you can easily back up your data online to Amazon S3 or Microsoft Azure, to any local or network drive, backup to FTP or SFTP, backup to DVD or CD, backup to Blu-ray or other removable media (such as USB HDD or flash drives). Backup4all offers a 30-day free trial, this way you can download, install and use it before deciding to purchase this backup software.
BoucneBack Ultimate: BounceBack automatically backs up files that have been changed or newly created on a continous basis. It backs up drive contents and restores single files or folders quickly and easily.
OopsBackup: With Oops!Backup you can rest assured that your data is protected every time you make a change - without slowing down your PC. It detects file changes automatically and versions and backs up the files for you.
SmartBackup is a backup utility that creates fast and efficient backups of your data, or a full bootable clone of your system. It can backup to anything that is mountable on your Desktop as well as external hard disks, flash drives, iPods, and any kind of network shares.
iBackup: iBackup is a simple to use backup/restore utility. It backups and restores user data and system and applications settings, e.g. System Preferences, Mail, iPhoto, iTunes, but also 3rd party applications settings, more than 250 plugins for backup application settings are available, which allow you to restore the settings and data of one application or to restore an earlier point in time.
Roxio Retrospect: Roxio Retrospect provides individuals with the reliability, ease of use, power, and flexibility they need to protect critical data on their Macs. Features include remote management of one or more backup servers and disk-to-disk-to-tape backups.
MimMAC: MimMac is a fast, easy-to-use, and comprehensive backup and cloning utility, designed to make backing up, synchronizing, merging, and cloning your data as painless as possible. With MimMac, there's no need to set up complex scripts, or navigate a bloated interface just to do simple tasks such as running multiple simultaneous operations or excluding items from your backup operation(s) -- everything is ready at hand in MimMac's straight-forward and compact interface.
Recover My Files data recovery software recovers deleted files emptied from the Windows Recycle Bin, files lost due to the format or re-install of a hard drive, or files removed by a virus, Trojan infection, unexpected system shutdown or software failure.
Features:
Recover from hard drive, camera card, USB, Zip, floppy disk, iPod, Andriod Phone, and other media
Recover files even if emptied from the Recycle Bin
File recovery after accidental format, even if you have reinstalled Windows.
Windows Data Recovery Tool: EASEUS Data Recovery Wizard
EASEUS Data Recovery Wizard provides a comprehensive data recovery solution for computer users to recover lost due to partition loss or damage, software crash, virus infection, and unexpected shutdown.
Features:
Recovers deleted or lost files emptied from the Recycle Bin
File recovery after accidental format, even if Windows has been reinstalled
Disk recovery after a hard disk crash
Retrieves data from RAW hard drives
Recovers office document, photo, image, video, music, email, etc.
Recovers data from a hard drive, USB drive, memory card, memory stick, camera card, zip, floppy disk, or other storage media
Advanced Disk Recovery: Advanced Disk Recovery scans the entire system for deleted files and folders and allows the user to recover them. Hard drives, partitions, external devices, and even CDs and DVDs can be scanned for recoverable files using this software.
Handy Recovery: Handy Recovery™ is an easy-to-use data recovery software designed to restore files accidentally deleted from hard disks and memory cards. The program can recover files damaged by virus attacks, power failures and software faults or files from deleted and formatted partitions. If some program does not use Recycle Bin when deleting files, Handy Recovery can restore such files. It can also recover files moved to Recycle Bin after it has been emptied.
R-Studio: R-Studio is a family of powerful and cost-effective undelete and data recovery software. Empowered by the new unique data recovery technologies, it is the most comprehensive data recovery solution for recovery files from NTFS, NTFS5, ReFS, FAT12/16/32, exFAT, HFS/HFS+ (Macintosh), Little and Big Endian variants of UFS1/UFS2 (FreeBSD/OpenBSD/NetBSD/Solaris) and Ext2/Ext3/Ext4 FS (Linux) partitions. It also uses raw file recovery (scan for known file types) for heavily damaged or unknown file systems. It functions on local and network disks, even if such partitions are formatted, damaged or deleted. Flexible parameter settings give you absolute control over data recovery.
VirtualLab Data Recovery: Regardless of the reason for data loss, accidental format, damaged partition, virus attack, deleted files, even a formatted hard drive, VirtualLab Data Recovery software does the job! VirtualLab is incredibly easy to use, yet so powerful and robust that it is used daily by data recovery companies world-wide. Works with all Windows operating systems, from Windows 98 to Windows 8, FAT 12/16/32 and NTFS file-systems. Forget having to use different software versions for different recoveries, VirtualLab does it all in one!
File Scavenger: File Scavenger® is a file "undelete" and data recovery utility for Windows® 8, 7, Vista, Server 2003, XP and 2000. File Scavenger® can recover files that have been accidentally deleted (including files removed from the Recycle Bin, in a DOS window, from a network drive, from Windows Explorer with the SHIFT key held down) provided that recovery is attempted before the files are permanently overwritten by new data. File Scavenger® supports both basic and dynamic disks, NTFS compression, alternate data streams, sparse files, Unicode filenames, etc. Except in severe cases, both the file and the folder path leading to the file can be recovered.
File Scavenger® can also recover files from a reformatted or corrupted volume even when the volume has been deleted and its original position and size are unknown. File Scavenger® can scan an entire physical hard drive to look for traces of defunct volumes.
File Scavenger® uses advanced algorithms to handle disks with bad sectors and badly corrupted partitions. It can be installed on a hard drive or run from a portable storage device such as a memory card, removable drive, or CD. To run File Scavenger®, you must log on as a system administrator to the computer where data recovery is intended.
Files can only be restored if the disk areas allocated to the files have not been overwritten by new data. All recovered files should be validated for the integrity of the recovered data.
Disk Doctor's Windows Data Recovery Software: Windows Data Recovery Software can recover data from any logical crash or cause for data loss on Windows. This data recovery software combines our TurboScan™ and File Tracer™ technology to recover data from even the most severely corrupted hard drives.
MAC OSX Data Recovery Tool: Boomerang Data Recovery Software
Boomerang Data Recovery Software for Mac OSX recovers accidentally deleted files, folder, document, lost or damaged partitions, RAID volumes, camera/flash cards, etc.
Features:
Recovers a complete disk that no longer mounts or is formatted
Re-assembles RAID volumes and helps recover mission critical data
Scans the entire disk and recovers deleted files and documents
VirtualLab is non-destructive data recovery software that recovers deleted files, damaged, or missing volumes, formatted disks, iPods, and even photos. It performs and exhaustive scan of the drive to locate lost partitions and files.
AppleXSoft File Recovery for Mac: recovers Mac data from deleted, corrupted, formatted partitions and from crashed drives where Mac based file system are installed.
R-Studio for Mac: R-Studio for Mac is specially designed for the Mac OS environment. It recovers files from HFS/HFS+ (Macintosh), FAT/NTFS/ReFS (Windows), UFS1/UFS2 (FreeBSD/OpenBSD/NetBSD/Solaris) and Ext2/Ext3/Ext4 FS (Linux) partitions. In addition, raw file recovery (scan for known file types) can be used for heavily damaged or unknown file systems. R-Studio for Mac also recovers data on disks, even if their partitions are formatted, damaged or deleted. Flexible parameter settings give you absolute control over data recovery.
Stellar Phoenix Mac Data Recovery: Mac Data Recovery software to reclaim files, documents, images, music, movies lost or deleted from any HFS, HFS+, FAT, ExFAT and NTFS file system based storage media.
FileSalvage: FileSalvage™ is an extremely powerful Macintosh application for exploring and recovering deleted files from a drive or volume. FileSalvage is designed to restore files that have been accidentally deleted, become unreadable due to media faults, or have been stored on a drive before it was re-initialized/formatted.
TechTool Pro: TechTool Pro is a full-featured utility program that contains options for testing and repair, maintenance (including disk defragmentation), and data recovery for Mac OS.
I hope you find all the relevant information and tips I discussed with you all today. I hope these small and not so small things help you keep your PC working great :) For any queries or suggestions please feel free to comment here.
I hope you all have a great day ahead! :) Happy Tuesday :) See you all soon! :D
Hey all my dear readers! :D I hope you all are doing great! ^_^
Why am I willing to discuss Data backup today is that, before we understand when, and how to install a fresh copy of Windows, we should backup our important stuff. Even if you don't wish to reinstall the operating system, most of the tips I share with you all in this maintenance series are helpful in avoiding the chances of an OS reinstall. Data backup is required in any case, since you might accidentally lose your important stuff.
Continuing the Computer Maintenance series I started a couple of weeks back, today I wish to discuss with you all the topics listed after the following links. Just in case you want to access the last posts in this series, here are the links:
Let's first consider in brief the structure of this post.
Introduction
Data Backup & Data Loss
Why do we lose data?
What to backup? How often?
Types of Backups
Windows 7 Backup & Restore
Data Encryption
Mac OSX Backup & Restore
Conclusion/Comments
Introduction
Computers store a lot of data gathered by users. But a system crash or theft may result in the loss of all that data. To avoid this, copies of critical data should be made frequently.
Data Backup & Data Loss
Backup refers to making duplicate copies of data that may be used for recovery after a disaster or damage to the data. Data backup should be the top priority in computer maintenance along with virus protection. Backup is required in case a file or a group of files is lost. Its main purpose is to create additional copies of data stored in the computer to be used to restore the original after a data loss event.
The user should back up critical information that cannot be easily replaced. Critical information should be backed up on a regular basis, and these backup copies should be placed in some other safe location. I prefer using external hard disks for this purpose. Most of the external hard disks come bundled with backup software these days. You can use them. Else I will discover more in my next post.
Data can be lost in many different ways, such as application errors in the software, configuration errors, or even a natural disaster. Data backup ensures that the data is secure in case of a disaster. It is easy and cost-effective to back up data compared with recovering the data after a disaster or system crash. Thus, we should back up our important information to be prepared for any emergency situation of data loss, that may arise.
Why do we lose data?
Natural Disaster: Such as fire, floods, etc. A backup in some other location can be helpful in such a case.
Human Error: Unintended and intended deletions, accidental formatting of hard drives, etc. The user should have a basic knowledge of using his/her computer.
Corrupt File System: The file system manages all the files and directories on hard drive. File system if corrupted(reasons maybe like, human errors, computer viruses, etc.). You can use Checkdisk utility of Windows to check your filesystem.
Software Corruption: An operating system may have a write error or memory error that causes the software to crash.
Computer Virus: Malware such as Trojans and viruses cause a lot of data loss. So you should always use some good AntiVirus software. Check this post
Hardware Malfunction
What to backup? How often?
This is an important part. I do have a 3TB harddisk in my PC, apart from 500 on laptop, 1TB+750GB+320GB External Hard Disks, and many many Pen Drives, so I guess I have enough space to backup every bit of data I got. But not everyone has this huge amount of space, and thus they need to be choosy and pick up important part of data to be backed up.
From my personal experience, I am listing some important chunks of data that you should backup:
Your Operating System files, like the installation media, drivers, etc. I use the Norton Ghost for this purpose.
Any important data you need with your work. I prefer using Dropbox for this.
Any critical software apart from drivers. I mean especially those you have paid for, and don't have any backup of.
If you use outlook, etc. then you'd want to backup your contacts.
Personal photos, and videos. Those lovely moments :)
Of course ideally you should backup every moment, but who would? O_O Nobody is foolish enough. So what's the solutions? Identifying the time intervals at which you should back up, is important. Depending upon the criticality of the data, etc. this interval will vary. If it is extremely important business related information, you might need to backup every day. If it is some photos and videos of your memories, then you might back up monthly/yearly.
I recommend using some good online backups(Cloud Storage Providers) for your data that can be backed up easily, or is too easy to backup. I recommend:
Dropbox: For important stuff that you need to keep extremely safe. Click Here to register for Dropbox. Using this link will give you 500MB bonus storage for free.
Copy: For photos, videos, and other heavy stuff. Click Here to register for Copy. Using this link will give you 5GB bonus storage for free.
Types of Backups
Full Backupks: Complete data to be backed up. What happens is, if you got like 100 GB of data on your system, everything, I mean every bit will be backed up. Generally the frequency is weekly, but for general home users, I suggest going for monthly since we don't have much changes weekly.
Normal Backups: The general backups where we backup our necessary files, not everything.
Incremental Backups: In this case we backup those files only which have changed after the last full backup. Although performing incremental backups is easy as compared with others, restoration using these backups is time consuming as the process follows a sequential approach.
Differential Backups: A differential backup backs up every file on a system that has been altered after the last full backup. It reduces the time for restoring files that are backed up during the week. Running differential backup on week days could make the personnel at an organization concentrate only on the backup process, which may result in confusion with a large number of backups. To overcome this, differential backups are performed once or twice a week.
Windows 7 Backup & Restore
The Windows has a backup utility that allows users to protect data by creating a duplicate copy of the files and folders on the hard disk and then archive to an external storage device. Thus, in case of hazard one can restore the archived copy of data using Automated System Recovery Wizard or Restore Wizard. Files will be restored to the correct positions(as at the time of backup). In Windows we can also create restore points which help in restoring the settings when required. For example, if you accidentally install some program you didn't want, you can use system restore to undo the effect of that unwanted installation.
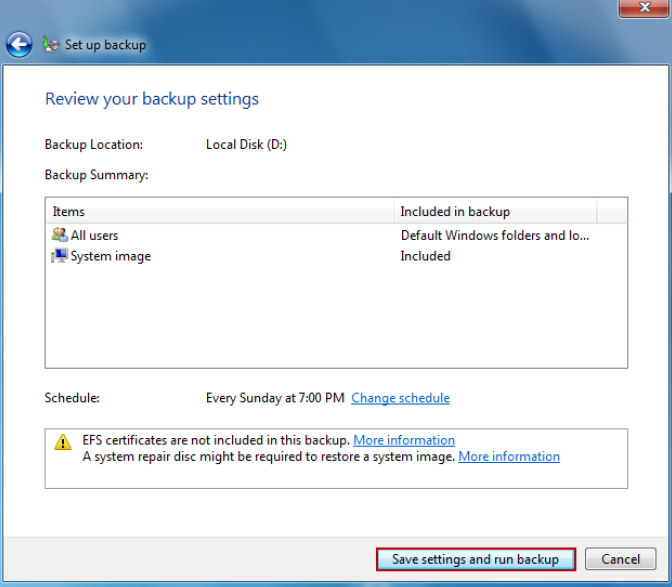
How to backup data?
Click Start -> Control Panel -> Backup and Restore -> Set up Backup to start a backup program.
Select the drive to save the backup and click Next.
Windows will now show you what will be backed up
I believe you guys have reached "What do you want to backup" screen. Check let Windows Choose[if you wish to backup what all the description below mentions], or let me choose[as per your choice, what all to be backed up?] and click Next.
Now wait for the backup to complete
How to restore Data?
Go to Control Panel -> Backup and Restore -> Restore my Files.
In the browse or search your backup for files and folders to restore screen, click Browse for folders to restore a folder, and then click Next.
In the Where do you want to restore your file? screen, check In the original location[if you wish to restore the directory as it was at the time of Backup] or In the following location to browse the desired location, and then click Restore.
In the your files have been restored screen, click Finish to complete the restoration process.
Data Encryption
Although making backups on the external storage media is safe and reliable, the external media may still be stolen or corrupted, making it impossible to restore the data. If it is stolen, the backup files may fall into wrong hands.
The data that is backed up into the external storage devices should therefore be encrypted with encrypting software. You can read my post on data encryption here. This makes the data present on that device unusable for unauthorized party.
Some of the storage devices come with encryption software. Like the WD My Passport Ultra, Samsung M3, ThinkPad USB 3.0 1TB Portable Secure Hard Drive, etc. Users may use this software to encrypt the backed up data, but often, this encryption software is clumsy, and may not be reliable. Users may therefore choose to use any third-party encryption software such as TrueCrypt, or other software to encrypt your backup data.
Mac OSX Backup & Restore
In Apple Operating System, you can use the Time Machine(software by Apple, not the real Time Machine! :P) to help you backup your data. Time machine automatically saves up-to-date copies of everything on your Mac - photos, music, videos, documents, applications, and settings. If necessary, a user can go back in time to recover the data. Time Machine works with Mac and an external had drive. just connect the drive and assign it to Time Machine. It automatically backs up the entire Mac, including the system files applications, accounts, preferences, music, photos, movies, and documents. What makes it different from other backup applications is that, in addition to keeping spare copy of every file, it remembers how the system looked on a given day. To launch Time Machine, navigate to the System Preferences window and click the Time Machine icon.
Features of Time Machine include:
A user can browse files using Cover Flow.
A user can perform a Spotlight search to find what he/she needs across all backups.
Before recovering a file, use Quick Look to verify the contents of the file, then click Restore to bring it back to the present.
Setting up the Time Machine:
The user can change the setting in the time machine according to his/her preferences by following thee steps:
Time Machine asks the user when a hard drive is connected to the computer for the first time to use it as a backup drive.
Click use as Backup Disk to open preferences window to configure the disk as a backup disk.
In the Time Machine preferences window, check Show Time Machine status in the menu bar to see the status of backup.
Click lock icon to secure the data present in the backup.
Restoring Files from Time Machine Backups:
Connect the backup disk.
Click the Time Machine icon is the dock.
Use the timeline on the right side of the window to browse and backup files of a certain date and time.
Select the file/folder and click the restore button.
Conclusion/Comments
I hope you find all the relevant information and tips I discussed with you all today. I hope these small and not so small things help you keep your PC working great :) For any queries or suggestions please feel free to comment here.
I hope you all have a great day ahead! :) Happy Tuesday :) See you all soon! :D
Hey all my dear readers! :D I hope you all are doing great! ^_^
So I told you guys last week about this upcoming series to be alternated with the Security tips series, remember? At the request of a good blogmate of mine, I will be posting some Computer maintenance posts with how-to-dos, software that’ll help, etc. to guide you all towards a clean and speeded up computer experience. I would include things like Windows installation, backup, clean-ups, secure-erases, recovery, etc.
But for the start, I’ll be considering a few general tips. I know I am taking up this thing a little slow, and the one who requested this might find them to be a little too slow to be helpful for now, but eventually as the other posts in this series would come up you all will find these quite useful. But I can assure you, these general posts will give you headstart for the time being! Moreover, this last college semester is keeping me so busy that I cannot post much, so I guess you all would understand.
Let's first consider in brief the structure of this post.
Introduction
Why does your computer slow down?
Some handy tips to remember always
Conclusion/Comments
Introduction
So starting with this post, I’ll be discussing with you all today some reasons why your computer generally slows down. It’s not always unwanted clutter, but there are more reasons. It’s not only that your hardware suffers from wear-n-tear, but your software too suffers from wear-n-tear. Computer maintenance is something if you take it up as a routine would not take much time and keep your computer using experience fast, speedy and wonderful!
So, let’s begin? Umm wait, I should first fold up my sleeves as the custom is ;)
Why does your computer slow down?
There are several reasons for a slow computer. When I say slow computer I mean, slow web browser, or slow booting up, or slow disk access, slow, slow, slow, etc. etc. etc.!!
You use a laptop, and just hibernate it, not shut-down
Background running programs – Well they take up RAM, Processor and keep your PC busy while you never know they were running :/
Low disk space – In these days where 1 TB hard disk is common, I guess if your disk has less than 4 or 5 GB free then you are some super lazy person who never cleans up their system! Get rid of rubbish or data that’s totally useless. Try to keep it clean!
Fragmented Hard Disk – This one is a big problem. You know your Windows is a great Operating system, but with recurrent creation of new files and deletion of old ones, there is a creation of holes in the disk space which is unusable cluster. To get rid of such wasted space, you should defragment the disk/volume regularly, like once in 3 or 4 months, that’d be good.
Malware – A big problem for those who visit unknown, unfriendly website regularly. That means visiting unsafe websites offering free games, free porn, free downloads of music, etc. For those using pirated software, malware is a troubling issue.
Hardware conflicts – Now this thing is a little technical, I’ll take it up in some later post.
Out-of-date software/drivers – This includes your Windows which you don’t update, or use old software/drivers just because you are too, rather toooooooo lazy to update!
Out-of-date hardware/incompatible hardware-software – So you are running Windows 8 on a dual core computer with 1GB RAM? Wow man! You are so cool. Now please buy a 9mm and shoot yourself! >_< Dear buddy! You need something better okay! Always make sure you have a hardware that supports what software you are going to run on your machine. For example, if you wish to play new games like the latest edition of Need for Speed, then you do need a nice graphic card, you cannot do without it. So don’t complain that your PC is slow if you are running a 64-bit operating system on a system with 1 or 2 GB RAM.
Overheating processor – There are sometimes problems with your CPU cooler that leads to overheating processor which means slow processor.
Too many startup programs – This imply that so many processes run at your system’s startup most of which are totally unneeded, that your booting time goes up sky-rocketingly!
Uselessprograms – You installed that free word processor because you thought it was cool. But then you came to know your good old Libre Office was better and came back to it. But you were too lazy to clean up your system, i.e. get rid off that unneeded earlier program! You should make sure your system has things you need. Else the clutter would eat up disk space, if it has auto-update features, it will eat up your Internet connection, it might be running background services, etc. etc. etc.!!
Registry Errors – Should I tell you how to fix registry? I guess a novice should never play with that. It’s like giving the 3-year old a vodka bottle instead of a cotton candy! I won’t touch this topic until late in this series of posts and let me warn you playing with registry => total damage to your operating system/installed software. So it is just not for beginners, even not of not so advanced peeps considering themselves pro users. Unless you know the inside of registry functions, hashes, et.c never play with registry!
You thought you bought a SSD and that should solve everything? But you were over smart and defragmented your SSD, now you complain a slow disk! A random access device should never be defragmented. Only your simple hard disks are meant for defragmenting, not your SSD, get it?
You are unaware – You think reinstallation of windows is the only solutions – NO! You need to change your ways to keep your system healthy
You love the free stuff – You are easily lures by free stuff. I know I took this up in an earlier point but I would like to add up. There are free things that are safe, and there are free things you would be lured to use and then, BANG!! TRAPPED! Free music listening might be safer than downloading free music; free games might be good as long as the source is trustworthy; free porn is safe as long as you are cautious!
When I said you guys have lot of clutter in your PC, I did mean a lot of temporary files and Internet cache. This not only slows down your PC, but also is potentially unsafe because it might have some data which can be misused to violate your privacy.
Some handy tips to remember always
The major thing I had to share in this post is this list of general tips that always come in handy. I’ll come up with detailed tutorials in the posts to come. Though I’d like you read my blog, but if you are too restless to wait for the next posts, you can search these topics over the Internet to assist you if you need any queries sorted out. Else I’ll do detailed tutorials as I said, so I don’t think there will be any questions that will remain unanswered, okay? So just be a little patient and wait for the next posts in this series for detailed instructions. For the time being, make a note of these tips and always remember them:
”Cleanliness is next to godliness” – Keep your system free of temporary files. Run disk cleanup from your disk properties to clean it up off the unneeded files. This helps you get rid of useless restore points, internet cache (if you use Internet Explorer), cookies, etc. For other browser users, you can do so from your respective browsers. You can use CCleaner to automate the process for you. Read about it, here: http://toxifier.blogspot.com/2013/07/ccleaner-is-great-solution-to-piles-of_9.html
”Too many pieces spoiling my peace” – Just tell me if you have to carry 1000 pages, what way would be suitable? To organise them in a file, or to carry them as a pile? Okay, you carried them somehow and stuffed them here-n-there in your room. Now your boss needs you to bring them back now! And you know she’s a not-so-friendly lady and wants you to work quickly. What now? You know you are screwed if you didn’t organise them in a file. Now find them, and arrange them and bring them, just to see her being so angry that she’s already shouting at you. Sounds cool? No? Then why do you expect your operating system to be so efficient at finding those small clusters?
It becomes a havoc for your Operating Systems to recollect those fragments and make them available to you speedily. What happens is that, consider this example:
Your disk stores files as clusters of 4KB (say) each. You stored a file of 10KB (2.5 clusters). The operating system cannot work with such decimal addressing. What would happen is that, the file will use 3 clusters. Next you stored 100 such files, thus wasting 200KB in these stupid unusable holes! To make things worse, you deleted some of the files from here and there, and copied new files. You kept repeating this for a few months, and had around 200MB of holes. Due to holes, the Operating system wasn’t able to store the more incoming files in sequential order due to lack of disk space. So the operating system will store its pieces here and there. Now when you’ll request a file, the operating system will recollect and readdress all the pieces one by one and bring the file to you. But you know it’ll take much time. It was better if these pieces were sequentially arranged, right?
Now don’t be so angry with Microsoft. People there are good people who gave you utility, and improved it timely to make it better, for reversing this fragmentation’s effects and making things speeded up again! They called this, simply, Disk Defragment and the placed it at easy, and accessible position. Just right click your volume in My Computer, and click Properties. Then defragment. Analyze the volumes and check if the fragmentation percentage is more than 10%. If it is so, defragment it!
I have earlier posted an article on how to defragment your hard disk. So I guess there’s no point repeating it, so here is the link to that article: http://toxifier.blogspot.com/2012/04/disk-defragment-in-windows-7-tech.html
”Too many cooks, spoil the broth!” – You are on a shared computer and things are not well managed. All users think they are the best at using computer and all have their ways to keep it clean. Do you think it will make the computer fast? NO! Make sure someone takes up this responsibility. Better, transfer it to some good software, like TuneUp Utilities or CCleaner.
”Hey kid(app)! What are you doing here?” – So you downloaded and installed something and it is now long forgotten. Not that you forgot it because you are too busy with other things (wait a minute, let me stop laughing! :P) but because that software was totally useless! So what should you do now? Do I have to tell you? If you cannot remember it, open up Uninstall a program (or Add/Remove program) from Control Panel. Scan the list to find out what all is totally useless. Oh damn! What did I ask to open! Phew! Well but now I have said it. So what are the warnings? Not everything that seems useless is useless. You’ll see so many Microsoft Visual C++…. installed. DON’T REMOVE ANY OF THEM!! GET IT? IN ANY CASE! Only remove of things you are sure of you installed and are no longer required.
”Why does that Printer Addon loads during startup?” – Be it that HP digital monitor or any such thing that does not comes in handy but takes up a lot of time during system startup. It’ll be better if you could minimize the number of programs that run during startup. I’d suggest using TuneUp Utilities or CCleaner to help you again. Though there is another powerful tool inside windows called msconfig, but it is not for novice users since it shows some processes which user should not try to stop from running at startup. Thus you should make sure you know what you are doing. So instead of using msconfig, some software utility is better so that you don’t touch something you should not.
”Love at first sight? You just love the looks, you don’t know the person’s nature as yet” – Exact is the case with windows. You think all the good looks are cool, but hey! They come at a price. If you need better performance, you have to give up your ‘eye-candy’ behaviour, okay? Now how to do it? Right click My Computer, click Properties -> Advanced System Settings -> Advanced -> Performance - > Click the radio button next to adjust for best performance. Of course it’s not a good idea since it’ll totally mar the looks, so you can select which visual enhancements you need and which you don’t need.
”Even polar bears come out of hibernation after 6 months” – Occasionally shut-down or reboot your computer if you are resorting upon Hibernate feature since very long. Many of my friends, who use laptops never shut down their laptop, just hibernate their PC. This doesn’t let the RAM getting free of useless clutter. So sometimes atleast do a good deed, shutdown a PC :D
”Dust-bin is for crap. But you need to clean it occasionally!” – Don’t pile up useless files in Recycle Bin. Occasionally clean it, okay? Also make sure you uninstall useless applications.
CheckDisk Utility – It helps you check if your hard disk is clean. The partition is aligned properly. The filesystem is healthy. There are not S.M.A.R.T. problems. Etc. etc. etc. :D Microsoft has included an awesome utility named checkdisk with windows that keeps the drives healthy by letting you know of ay errors, and fixing them in process. Right click your volume, click properties -> Tools -> Check Now
”A healthy mind rests in a healthy body” – Just like your body needs to stay away from viruses so does your computer so that it functions smoothly. Install a good antivirus program. If you don’t want to pay much, I suggest using Avast. I have done a detailed post on antiviruses, you can refer here: http://toxifier.blogspot.com/2014/01/guidelines-for-securing-operating_14.html
”Go green is the need of the hour, but for how long? You cannot celebrate Earth-hour every single minute!” Your computer’s energy settings might spoil things. If you want a better battery life, you might have changed system power plan to something more energy efficient. But, be a little realistic. Not the best energy setting is good for performance. If you want better performance, you’ll have to give up that go-green habit for the time being :P So do change to performance plans when doing some processor intensive task, okay?
”Up-to-date means ready for the new world and new challenges!” – The point is if you want your machine to compete with the ever changing needs, you need to keep it updated. No software is built sans bugs. Thus updates are necessary to fix issues that keep getting uncovered during the use and feedback cycle. Turn on automatic updates if your operating system is genuine and you have a good Internet Connection. Always use latest version of your web browser. Always keep antivirus updated.
”Living without air?” – Your processor does a lot of work. So it needs nice cooling and ventilation. Make sure your CPU fan has no issues. I mean all fans, which includes the fan of your Power Supply Unit, Processor, Graphic Card, and any other fans you use in your cabinet. In case you are a laptop user, I hope you don’t like to use a furnace-hot keyboard, do you? Get rid of any blockages in the ventilation. So occasionally clean the casing with dry air, you can buy a low-power blower for that.
”32bit for less than 4GB, 64bit for more than that” – This is the mantra! Always remember this. If you have less than 4GB RAM, you don’t need 64-bit version of your operating system. So be wise. And if you are using a 64-bit windows on a machine boasting less than 4GB RAM, then change it now. Don’t worry! the same key would work for both version of windows. Though software versions for 64-bit version of Windows won’t work on 32bit operating systems, so be cautious! Increase your RAM if you need to. It doesn’t cost that much.
Good Luck – With all that said with images for your reference, I don’t think I have to say anything else :D Remember them and be a wise user, and nice user :)
Conclusion/Comments
I hope you find all the relevant information and tips I discussed with you all today. I hope these small and not so small things help you keep your PC working great :) For any queries or suggestions please feel free to comment here.
I hope you all have a great day ahead! :) Happy Tuesday :) See you all soon! :D
Hey all my dear readers! I hope you all are doing great :) The last two posted were quite Interesting right? Let's continue with the flow and let me bring the Part 3 to that Guidelines Post, the last one in this series of 3 posts.
Please note: This Post is quite Specific to Mac OS X
Enabling and Locking down the Login Window
The following steps would help secure login screen by disabling the auto-login feature. It is a good practice to disable it and enter password whenever you wish to access your PC.
Click Apple Menu -> System Preferences -> Accounts -> Login Options -> Display Login Window As -> Name and Password
Uncheck Automatically login and:
Check Hide the Sleep, Restart, and Shutdown buttons
Uncheck Enable fast users switching, if not used
Configure Accounts Preferences
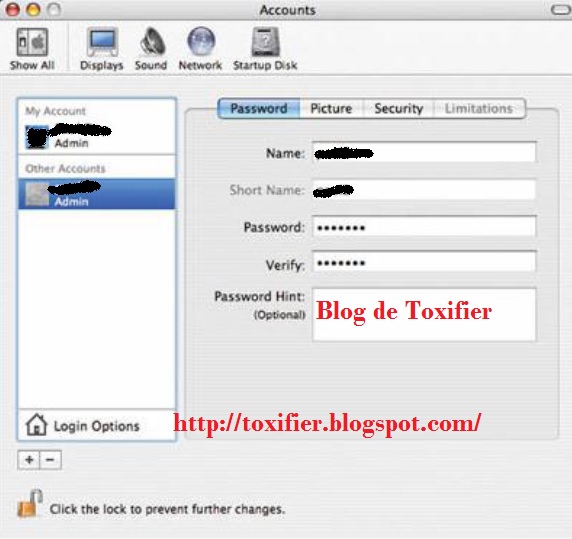
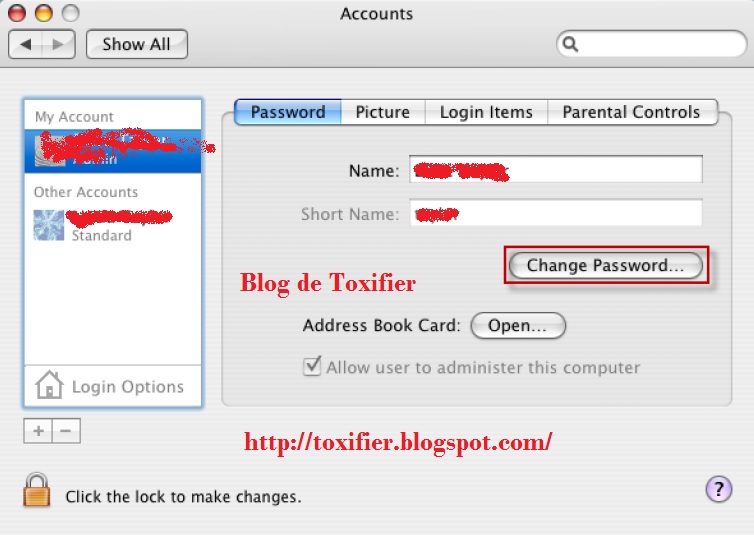
The following steps will help you change your Account password. It is a good practice to regularly change passwords.
From the Apple menu, choose System Preferences. From the View menu, choose Accounts and select the user name whose password you want to change.
Click Reset Password(Mac OS X v10.3/v10.4) or Change Password(Mac OS X 10.5+).
Enter a new Password in both the Password and Verify fields. Click Reset/Change Password again.
If a dialogue box appears with a message Your Keychain password password will be changed to your new account password, click OK.
Creating Accounts
Always make sure that an account is not shared by several users. Try and make separate accounts for separate users. This makes the things private for each user, i.e. their Home Directories stay private and hidden from each other. Individual accounts thus maintain accountability. Administrator users should use their administrator accounts ONLY for administrative purposes.
Secure the Guest Account
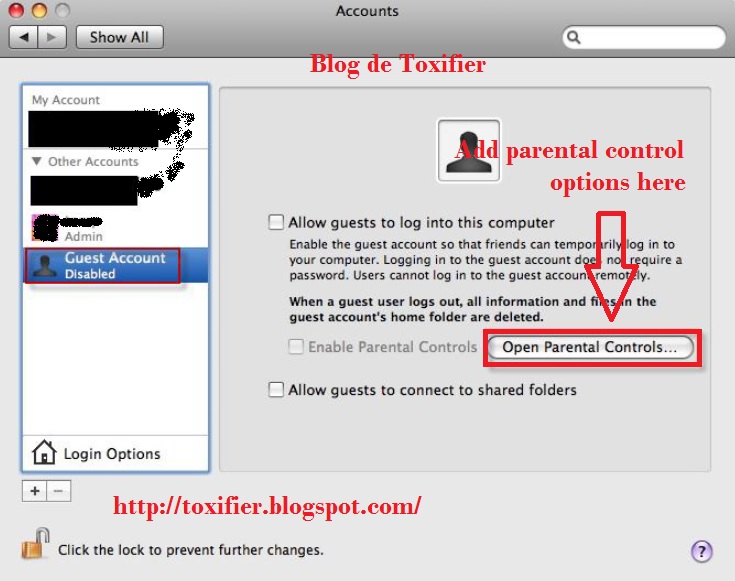
Guest Account should be used only for temporary access to the system. The guest account should be disabled by default as it does not require a password to login to the computer. If the guest account is enabled, enable the Parental Controls to limit what the users can do. If the user permits the guest account to access the shared folders, then an attacker can easily attempt to access shared folders without a password.
Controlling Local Accounts with Parental Controls
Open the System Preferences and click Accounts
If the lock icon is locked, click the lock icon and enter the Administrator name and password.
Select the user account to be managed with parental controls and check the Enable Parental Controls box.
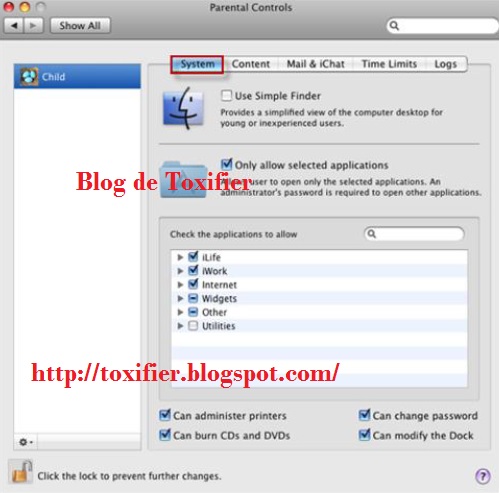
Click Open Parental Controls..., click System, Content, Mails & other messages, Time Limits, and the number of logs and the set the values as required.
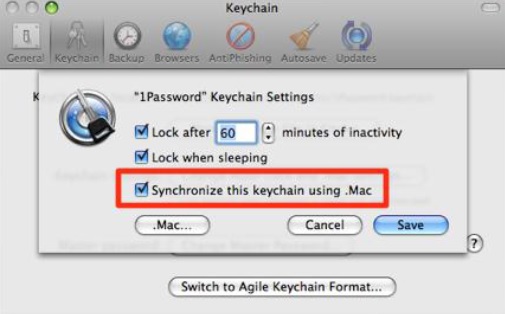
Use Keychain Settings
A keychain stores passwords on a disk in an encrypted form and it is difficult for non-root user to sniff a password between applications.
Check lock after, change minutes of inactivity to desired minutes, check Lock when sleeping, and click Save.
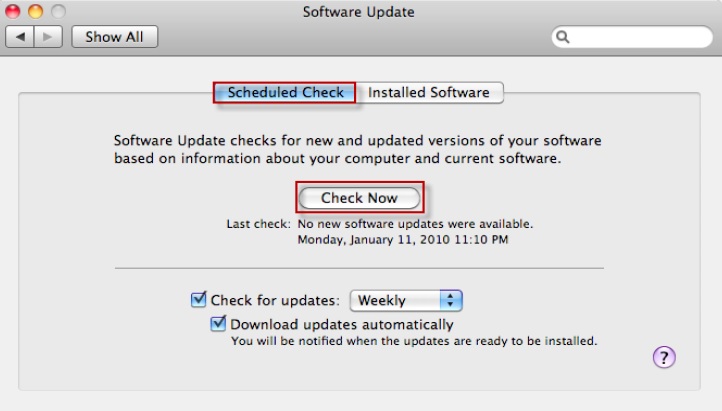
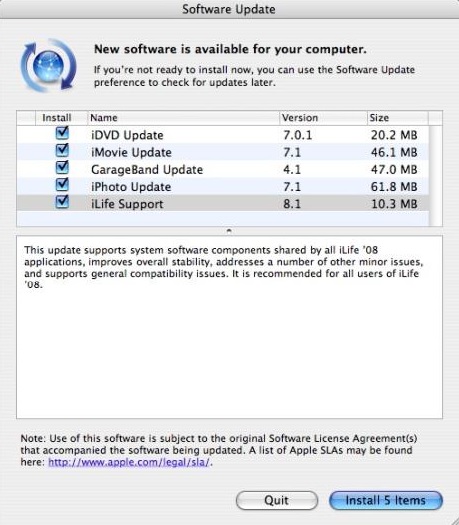
Use Apple Software Update
Mac OS X includes an automatic software update tool to patch the majority of Apple Applications. You might think of it being similar to the familiar Windows Update, or Microsoft Update to be precise. Software Update often includes important security updates, which should be applied to the user's machine. To navigate the software update:
Open software update preferences and click the Scheduled Check pane.
Check download important updates automatically and Check for updates.
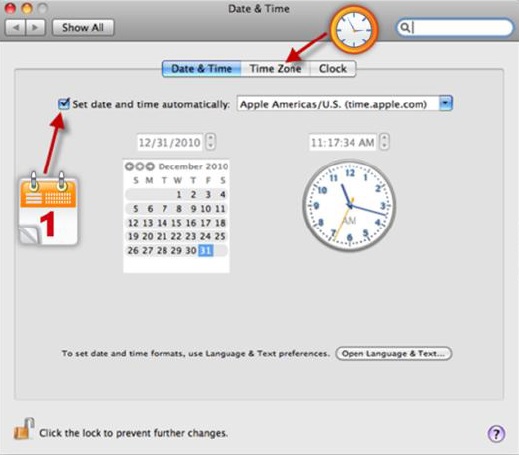
Securing Date and Time preferences
Open Date & Time preferences. In the Date & Time pane, enter a secure and trusted NTP server in the set Date & Time automatically field. Click Time Zone button -> Choose a Time Zone.
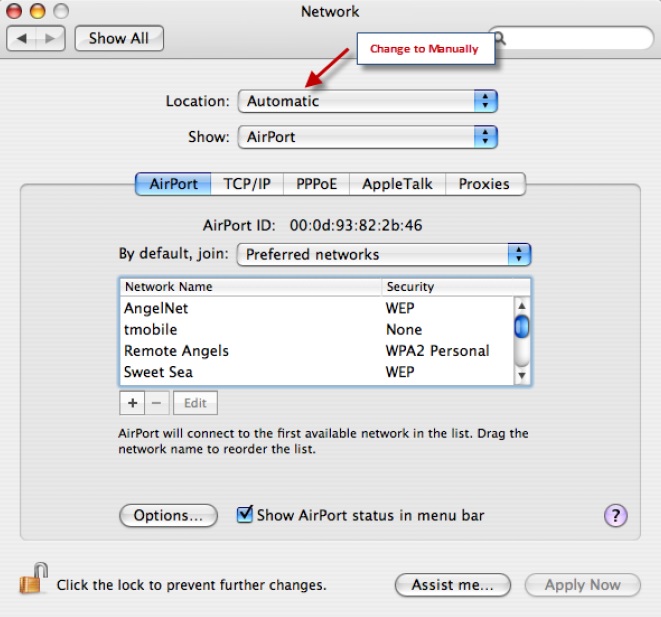
Securing Network Preferences
It is recommended to disable unused Hardware devices listed in Network Preferences.
Open Network Preferences. From the list of Hardware devices, select the hardware device that connects the network.
From the Configure pop-up menu, choose Manually.
Enter the user's static IP Address, subnet mask, router, DNS server, and search domain configuration settings.
Click Advanced. In the configure IPv6 pop-up menu, choose Off and then click OK.
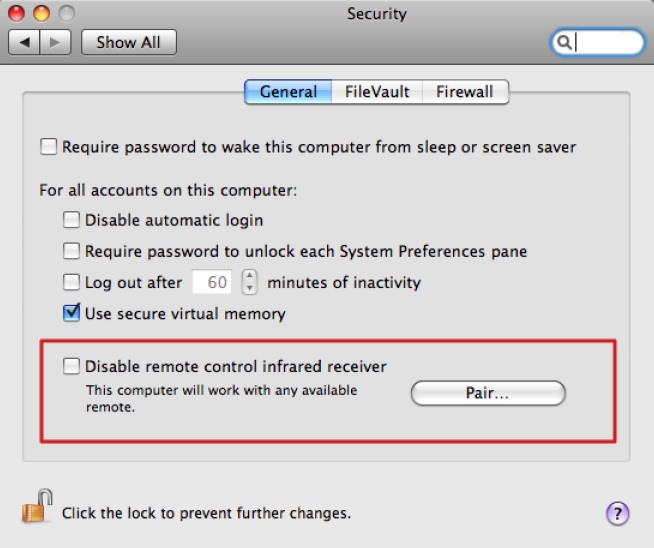
Enable Screen Saver Password
To prevent unauthorized access to the system, enable screen saver password.
From the Apple menu, select System Preferences, click Security, and click the Lock icon to make changes.
If prompted, type the admin user name and password
In the Security window, click the General tab and check Require password to wake this computer from sleep or screen saver(Leopard) or Require password immediately after sleep or screen saver begins(Snow Leopard).
In addition to this, secure the system by selecting: Disable Automatic login, Require password to unlock each System Preference, Use secure Virtual Memory, Click the lock icon to prevent further changes.
Close the Security Window and restart your machine.
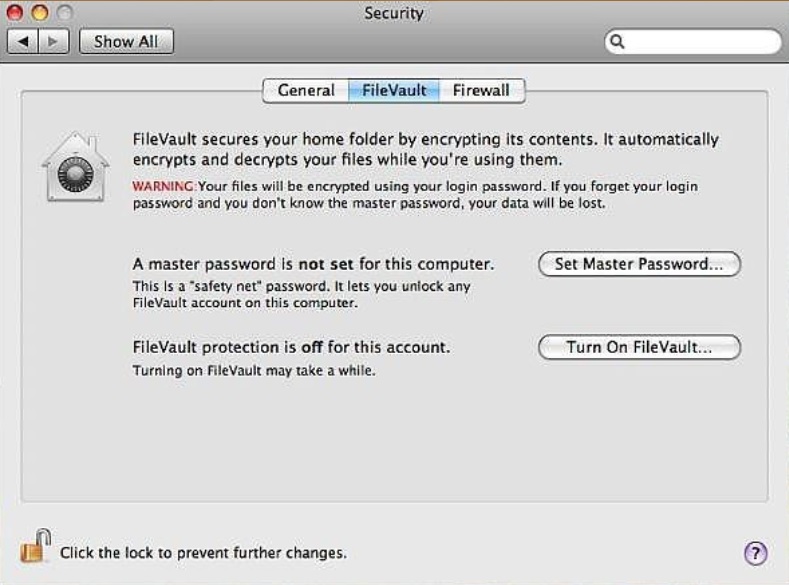
Set up FileVault to keep Home Folder Secure
Steps to setup File Vault:
Click System Preferences -> Security -> FileVault -> Set Master Password.
Create the master password for the Computer, but ensure that that this password is different from the user account password.
Verify the password and Click OK
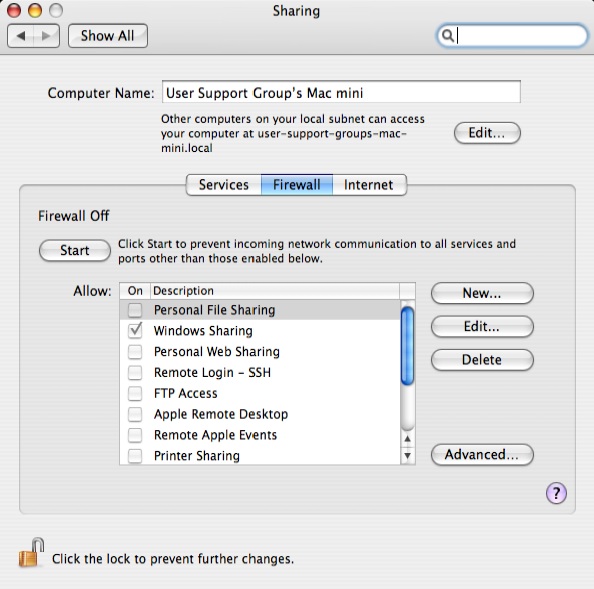
Firewall Security
Firewall should be used to block unauthorized programs from accepting new network connections. To improve the firewall security:
Click System Preferences -> Security -> Firewall
Click the lock icon to make changes.
If prompted, type the admin user name and password.
By deafult, the firewall allows all incoming connections, change the option by clicking the second (Allow only essential services) or third option (Set access for specific services and applications).
Now choose which application(s) you want the firewall to allow and which to block.
Click the lock icon to prevent further changes and close the security Window